The purpose of this guide is to give readers the basic knowledge required to select, build and maintain components in a custom water loop. It is not a technical outline of the hardware involved, but rather a simple overview to give the reader background information on what custom loops are, how they are assembled and how to maintain them. This guide is not, and will never be, 100% complete. As technology continues to advance, new solutions for old problems will arise, new problems with new solutions will need to be addressed, and this guide will slowly become outdated.
With that said, I hope you enjoy the information contained within and I hope you gain a deeper understanding in the technology and process behind custom water cooled computers.

Just a little preface before you start reading: I will be referring to 'Water Cooling' as both 'water cooling' and 'liquid cooling.' I like to use 'liquid cooling' for general 'cooling with a liquid' and not necessarily PC related, and 'water cooling' to refer specifically to cooling PC components with liquid. I realize that you don't have to use water as the liquid in your loop (and I even get into that in later sections) but it makes it easy to refer to one or another.
A very important part of any process is figuring out why you're doing it in the first place. Lots of people are going to read this and ask 'Why the hell do you need to go through all this trouble when a good air sink would be just as effective?' Liquid Cooling something is far more difficult, complicated and rewarding than just slapping a big heatsink on it and calling it a day, and it's therefore important to understand the process and theory behind it.
The purpose of Liquid Cooling varies from implementation to implementation. In general:
The ability to move heat exchanger to other locations is pivotal in some implementations. Most cars, for example, would look pretty funny if they all had air cooled engines instead of a liquid solution. Some machines use radiators to move the noise of fans to a different locations
Most Liquid simply has the ability to hold much more heat than metal or air, and therefore takes much more energy to heat
Liquid radiators are more efficient at transferring heat to the air compared to conventional air sink fins
Water blocks are almost always significantly smaller in physical size compared to air sinks. This can allow for very thin and small hardware implementations while still being able to dissipate heat effectively
This one is mostly for computers, but I think we can all agree that a good water loop looks really freakin' cool!
And now for the disadvantages of custom loops, to weigh up whether it is the right choice for you:
As mentioned in the first paragraph, compared to air cooling, Liquid Cooling is significantly more complicated and time consuming. There are many more nuances and little gotchas that you have to look out for and work around
Any Liquid solution is going to be significantly more expensive than a comparable air solution. This mainly because there are many more separate components in a Liquid loop compared to an air sink
A water loop requires much more maintenance compared to an air sink. This requires time and patience
I saved this one for the end for a reason. If you can follow directions and not do anything stupid, water spills are essentially a non-issue. The first thing people think of when they think about a water loop is 'What if I spill water on my expensive computer?' I'll get more into this in later sections, but proper water loops will have an extremely small chance of damaging something, even if there are spills or leaks
Depending on how you want to assemble your loop, you may take advantage of some or all of the advantages and will be burdened by most, if not all, of the disadvantages.
Please note: Before you go any farther, let me just say that water cooling a PC is not for everyone! It's for people who either need to use one of the above advantages or for people who have researched it and found their own reasons. I highly recommend that you, at the very least, read ENTIRELY through this guide before starting this project. Ideally, you should do even more research past the information contained in this guide.
I, nor ChooseMyPC.net, will be responsible for ruined hardware or broken egos resulting from the misuse of this document. This is simply a guide, it's meant to aid in the first step of this process: research. Nothing more.
To start off the main part of the guide, I'll give you a quick rundown of the various components involved in a PC water loop and the measurements and statistics used to determine performance. I will try to be as detailed as possible, but I may miss a few points here and there.

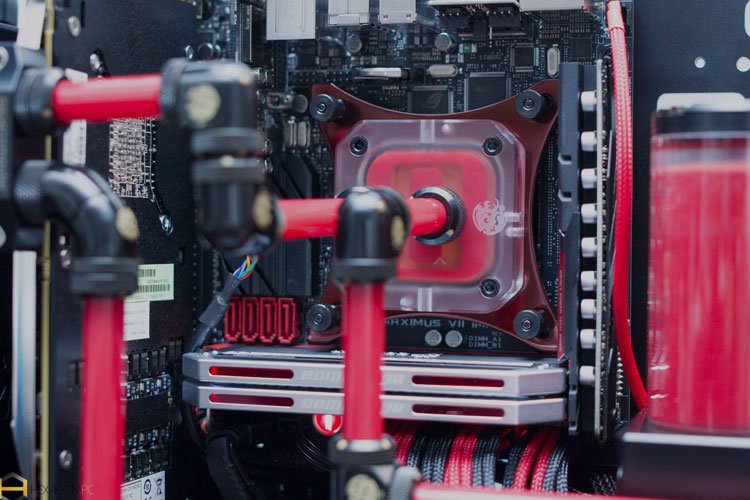
Water blocks are used to transfer heat from the source into the water. They are essentially heat exchangers that move heat energy to the water from the heat generating component.
Water blocks rely on surface area and flow rate to transfer heat quickly and effectively. Just like air sinks, the more surface area there is, the more heat can be transferred.
To add surface area, water block manufacturers rely on fins, pins and channels. Depending on the design, a water block will make use of any one of those 3 concepts. There is no single best solution for a good water block, so don't ask about one. Your best bet is to look at reviews and other data.
The restriction of the block is often a metric used to compare blocks. This is a measurement of how much water can be pumped through the block in a given amount of time. High restriction blocks often perform better with a more powerful pump and a loop of it's own. Low restriction blocks may sacrifice performance, but they also allow you to chain more blocks together. This is a minor concern in reality, but it's worth noting.
CPU water blocks are the most common type of block, by far. Often made of copper and coated with nickel for a shiny silver finish.
CPU blocks make use of pins and fins mostly. Some CPU blocks are designed with channels, but there aren't many out there. They attach to your motherboard just like any other aftermarket heatsink, with a backplate and other mounting hardware.

GPU blocks are designed to fit on your graphics card. There are 2 main types of GPU blocks: Full cover GPU blocks are designed to (as the name suggests) fully cover the GPU PCB. Blocks of this type often support a single card and PCB design. They cool the GPU core, memory and power delivery (VRMs) with a single block. Universal GPU blocks are often designed to fit on any GPU. They may include brackets for many different types of mounting scenarios, just like CPU blocks.
Even though most GPUs today use standard mounting holes and specifications, universal GPU blocks (despite the name) are not always universal. Because universal blocks only cool the GPU itself, you will often need separate cooling on the power delivery (VRMs) and memory. This often comes in the form of stick on heatsinks.

In addition to cooling your GPU and CPU, some people like to attach water blocks to additional heat-generating components in their PC.
Chipset blocks are similar to GPU blocks. They come in universal and board-specific versions. Board-specific blocks are almost always limited to a single motherboard version. Board-specific blocks are very rare, even for expensive and popular motherboards.
Other places people have put water blocks are: RAM. Most RAM blocks are custom designed and rather expensive. Nowadays, RAM doesn't really generate enough heat to warrant a fully custom solution. Hard Drives. Yes, there have been water blocks designed to fit around hard drives. No, they aren't really necessary. PSUs. There have been a few PSUs that have connections for water loops. Again, this isn't really necessary and it's very expensive.
Pumps are responsible for circulating water around your loop. They often vary in physical design and size, power consumption and noise generation.
Pumps are categorized and measured with, in addition to dB for noise and watts for power consumption, head pressure and flow rate.
Flow rate is the measurement of how much liquid a pump can move with no restriction. Usually measured in gallons/liters per hour, flow rate doesn't tell you much unless you also know the head pressure, because no water loop is going to have 0 restriction.
Head pressure is how hard or high a pump can push liquid at full load (with 0 flow or 100% restriction). It's measured by seeing how high a pump can push water through a thin tube and is usually measured in feet or meters.
A pump with lots of flow is useless if it can't push that water through minor restrictions. Similarly, a pump with lots of head pressure and not a lot of flow isn't very useful either.

The most common pump today is a variation on a single design, the Laing DDC pump. The pump only has a single moving part and is very reliable. It's essentially a large magnet with an impeller attached to it in the middle that gets moved by electromagnets around the perimeter of the pump.
Because of it's reliability and effectiveness, lots of companies have taken the design and changed minor details, like the top housing geometry for more flow or head pressure.
Chances are, unless you are looking for an extremely powerful pump, your best (and cheapest) bet is a DDC pump from any one of the known component manufacturers.
Other pumps have more powerful motors or other features that can't fit inside the DDC form factor, but often require more maintenance and care.
Radiators and heat exchangers are technically the same thing (a radiator is a heat exchanger). They are designed to transfer heat from one substance to another efficiently. However, the term 'radiator' usually refers to a liquid-air heat exchanger.
Simply put, the point of a radiator in a custom loop is to get heat out of the liquid and into the air so it can go pick up more heat from the components.

Water cooling radiators come in all shapes, sizes, thicknesses and fin densities.
Unless you want a passive radiator or non-water cooling radiator (like a heater core from a car, which is not really recommended), the one you select will be based around a fan size.
Therefore, most common fan size also gets the most base common radiator size, 120mm. In addition to single 120mm radiators, you also have doubles, triples and even quads. Some companies even make radiators meant to hold 9 120mm fans in a big square! Of course, just because 120mm fans are the most common doesn't mean that they are the only fans around, you can find radiators that take any size fan you want.
Additionally, some radiators are thicker than others. This, combined with fin density, determines what the ideal type of fan you want to use on the radiator is. Thickness is measured in mm and comes in all sorts of measurements, the thickest I've seen being 80mm and about 20mm for the thinnest. Fin density is measured in FPI or Fins Per Inch. 30 FPI is on the high side while 5-10 is low.
Thicker and denser radiators ideally need fans with high static pressure to push air through the fins. Thinner radiators with less fin density perform better with fans that have lots of airflow.
In addition to shape, size, thickness and fin density, some radiators have other features that are worth mentioning.
Some radiators are 'Crossflow' radiators, which means that it has an inlet on one end of the radiator and another on the other end (while regular radiators have both on the same side). These are very helpful for some loop setups and not great for others. What you decide to buy all depends on how you want to set up your loop.
Some radiators also have different fin materials and paint. These can affect performance and other thermal characteristics, but the effect is largely aesthetic.
Some people (although I haven't seen many people doing it anymore) like to put shrouds between their fans and radiators. A shroud, usually made of plastic, is meant to mitigate the 'dead zone' of no air that a fan mounted directly to the radiator has. It simply separates the fan and radiator by about an inch to reduce the size of the zone.
You can go with or without shrouds, it makes a relatively small difference. Sometimes, people mount them for aesthetic reasons.

Tubing seems relatively self explanatory. I mean, it's just tubing, right? Wrong.
Tubing and fittings are often where lots of people mess up and end up having to wait a week for a tiny fitting arrive to set up their loop.
It's also the place where a lot of money ends up, especially if you buy premium fittings, so keep a tally!
Tubing itself is measured with 3 separate, yet important, measurements:
This is, you guessed it, the diameter of the inner wall of the tubing. Common sizes are 1/2', 3/8' and 7/16'
Diameter of the outer wall of the tubing. Common sizes are 1/2', 5/8' and 3/4'
This is the difference of the OD and ID, and is extremely important. Tubing with an ID of 1/2' typically has an OD of 3/4', but it is in no way standardized. When ordering your tubing and fittings, make absolutely sure your tubing will work with your fittings
Tubing suitable for water loops also comes in different materials:
Flexible and good for tight loops. Not exactly cheap, but will make life a lot easier
Not as flexible as tygon, but about half the price. A good middle ground
Extremely cheap, but also prone to some nasty kinks. I would avoid vinyl if you can
There may other brand names behind the material, but chances are if you buy it from a good water cooling manufacturer it's going to be tygon.
Some clear tubing also has a nasty habit of clouding up when used for about a month. Whether this has to do with a coating on the inside or some other problem remains to be seen, but it would be worthwhile to do a quick search on whatever tubing you're thinking about getting to see what other people are saying about it.

One thing people like to do to prevent kinks and achieve tighter bends with cheaper tubing is add springs or coils to it to keep it round. Coils go on the outside of the tubing and are sometimes added for aesthetic reasons and are typically made of plastic. Springs go inside the tubing, are meant to stay hidden and are usually made of metal. Springs will impede flow by a relatively negligible amount.
For springs, make sure they will fit the ID of whatever tubing you're using, and for coils make sure they fit the OD.

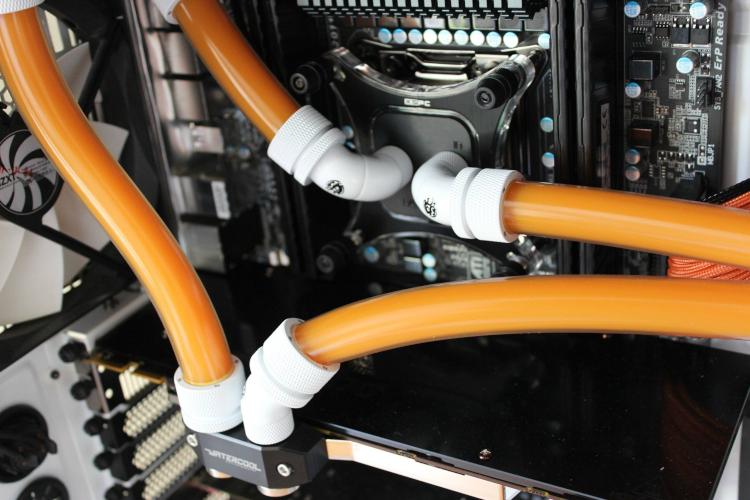
By and large, there are only two types of fittings, compression fittings and barbs. Barbs are fittings that grab onto the inside of the tubing and keep it secure. Compression fittings are almost exactly like barbs but they have a compression ring on the outside for extra security (whereas most people who use barbs use zipties for security). Compression fittings cost anywhere from $5 to $15 apiece and barbs are usually under $5 depending on what you get.
For barbs, all you have to check is if the ID of your tubing matches the fitting size. For compression fittings, you have to look at all 3 measurements because they all matter. Failure to check this often results in compression rings that are too small or large.
The other thing you need to check is if your fitting will fit onto the component it was selected for. The most common thread size, by far, is G1/4. Even though almost every component you buy will have G1/4 threads, it's always good to double check.

The purpose of reservoirs and T-lines is the same: to remove air from the loop, and the way they go about it is similar.
A reservoir is meant to hold extra water in a loop to allow for air bubbles to slowly be replaced by water as it circulates. It holds a relatively large amount of water in a tank that is essentially stored until it gets replaced by air. The only downside of a reservoir is that it costs money and takes up space.
Some reservoirs have pump mounts and other goodies that might be useful for your loop.
Nowadays, T-lines aren't really worth the trouble because a good reservoir isn't hard to find. I'm only mentioning it because it you may hear it talked about from time to time.
A T-line is just a part of your loop (near the top of the loop) that has been T-ed off and had a section of tubing added. This effectively functions as a tiny reservoir, but holds a very small amount of water. Some people use little T-lines for fillports.
People like to put other little things in their loops like flow meters, temperature probes and special coolant additives. While it's impossible to go over every single one in detail, these are some of the useful ones that you might want to know about.
Simply used for seeing if your pump is pushing water around the loop, flow meters don't really measure flow all that well, despite the name. Passive meters are usually a paddlewheel that the coolant spins to indicate flow. Active meters have a wire for feedback to your motherboard (like a fan RPM sensor).
Temperature probes, as you may have guessed, are used for measuring the temperature of the water. They usually look similar to a T where the base of the T is the actual sensor and the water flows from one branch to the other.
Keep in mind, the temperature of the water is not equal to the temperature of the components being cooled (water cooling water rarely gets above 40C).
Everybody and their sister has their own opinions on what the best liquid to run in your loop is. Yes, there are some additives that might improve this or that or make this look look cool or some other special thing.
However, the easiest (and cheapest) liquid to use in your loop is, by far, distilled water and something to stop stuff from growing. You have two easy options for that: Biocide and a Silver Kill Coil.
Biocide is exactly what it sounds like: liquid that kills living things. You simply add a couple drops for every X amount of water and it prevents algae from growing.
Silver Kill Coils are actually even easier. You simply put them somewhere in your loop (preferably where water flows) and it prevents growth. If you want more information on how they work, do a quick Google search, it's interesting stuff!
Ok, so you just read the descriptions and now you want to build a loop for yourself. Firstly, awesome, you decided to take on this project. Secondly, you need to start picking your components.
Please take these next sections as recommendation ONLY. This should not be the only guide you read before taking this project on. Do as much research and read as many guides as possible to get more understanding to how this stuff works before you spend your money on this stuff!!
Component selection is a very important part of the process. You need to make sure everything fits beforehand and if you haven't had any experience with it just yet, it's pretty intimidating to spend so much money on something you're unsure about.
Therefore, you need to make absolutely sure you're getting the right stuff for your hardware and do a lot of research. I will not be recommending specific components for your circumstances. It is your job to research and find the best solutions for your system.
Water blocks are be base of your water loop. If you can't find any blocks that fit your hardware, there isn't much point to pursuing the venture.
For CPU blocks, the process is relatively easy. Pick a block based on your research and make sure it's going to fit on your socket. Just like aftermarket CPU coolers! Make absolutely sure you have all the materials required to mount your block. Lots of blocks today come in AMD or Intel specific versions, and not all of them support every socket.
For GPU blocks, it's a little more complicated. If you're looking for a full cover block, then you need to figure out 2 things: Is your card a reference PCB design? If it is, look for a waterblock and double check on the manufacturer's compatibility list to see if it's supported. If it's not a reference design, look and see if a waterblock was still made for it (as is the case with some of the higher end cards with a non-standard PCB layout).
If a full cover block is unavailable, you might have to look for universal block. Mounts for universal blocks are very similar to CPU blocks for your GPU and it's mounting holes. Each GPU has it's own mounting system. Find yours and check with the manufacturers compatibility list to see if it will work.
Generally, to reduce corrosion, people like to select blocks made of the same metal. For example, if you have a copper block on your CPU, try and get a copper block for your GPU as well. For nickel plated blocks, try and get blocks that are both nickel plated. This isn't a huge concern, but it's worth mentioning. Keep in mind that this is only a problem with metals. Delran or Acetal tops aren't going to have an effect on your loop metals.
Pump selection is another important part of the process. Like I said in the previous sections, you will most likely be picking up a pump based on the Laing DDC pumps.
Do some research and find out, based on your water block selection, what pump would be good for you.
Your radiator selection will be heavily based around your case selection. While I can't give specific details for every situation, I can give you a few hints on radiator selection:
Pick a fin density and thickness that works for your fans. At the end of the day, any fans, even ones with low static pressure, will push air through any radiator. Don't worry too much if you don't know the ratings of your fans.
Radiators are actually bigger than the fan slots that the mount on. Make sure you have enough room to actually fit the radiator on the fan mount you select. As a general rule of thumb, try to have at least a 120mm radiator for every GPU and CPU water block in your system.
If it looks like a crossflow radiator would work better in your system than a regular one, go for it!
Never, ever, ever (ever) buy or use an aluminum radiator in a computer water loop. You will regret it later when your blocks are corroded down to nothing.
If you want to do push-pull with your radiator, chances are you are going to need extra mounting hardware (like longer screws and more washers). Don't forget that!
When you pick out your fittings, double check that your fittings work with your tubing and components. Make sure to get enough tubing for your loop. I usually get about 10 feet even though I could probably get by with 5. It's always good to have a little bit of headroom. I also like to buy 1 or 2 more fittings just to have a couple extra.
There isn't much to say here other than to get what you like best.
When you pick out the remaining components for your loop, it's very important to ask yourself 'is this going to physically fit in my computer?' It helps to get product measurements and a ruler and check out your case.
Other things you should be wary of are: - Make sure you buy whatever solution you picked for stopping algae growth (Silver Kill Coil or Biocide). - Pick up any springs or coils if you think you need to make any tight bends - If using barbs, get some hose clamps or zipties to keep them secure - Make sure you have a plan for mounting the reservoir. Bay reservoirs are significantly easier to mount and are very handy. - Don't forget your flow meters or temperature probes!
Throughout this portion of the guide, I will assume you already have a computer setup and ready with the PSU, motherboard, GPU and all your other components ready to go. Some people like to build their loop outside of the PC and test it that way, but I was never a fan of the practice and therefore won't be covering it.
Ok, so you got all your components selected and ready to roll. Your parts just arrived and you're bouncing off the walls with excitement just thinking about putting your loop together. First things first: tools. In addition to your water cooling components, you also need a couple of other tools that will help a lot when putting things together:
A friend or other semi-educated person willing to help you out. Having another pair of hands is extremely helpful when putting everything together. Even if they don't have technical skills, somebody standing by with paper towel or a person to hold the flashlight is always good.
LOTS of paper towel. I'm talking an entire roll at the very least. Water WILL spill and you will need to clean it up.
Experience with hardware in general
A flashlight. Very helpful if you lose a screw or something. Sometimes the mounting for certain components can get tricky.
Screwdrivers and hex keys. You should have a good assortment of Phillips and flat screwdrivers. Additionally, some components (like some water blocks) use hex screws instead of regular screws.
A 12 V power supply with enough current to run your pump. Because you are going to need to turn in on and off many times, using a PC power supply can get tedious.
Dykes (wire cutters) for cutting stuff and pliers (both needlenose and blunt) for bending, pulling, gripping and breaking stuff.
A funnel that can fit inside your tubing. Very useful for filling and flushing. Makes the whole process about 30x less frustrating.
Ruler or other measurement tool for the planning stage.
6-8 hours of time. I completed my first CPU only loop in about 4 hours and boy was it a long, stressful process. I highly recommend that you complete the entire thing in one sitting, if possible.
Once you get that stuff together, get your parts out for cleaning.
The first thing you want to do when you have all your components together is clean the hell out of everything. Contrary to popular belief, water cooling components will not come ready to run. You need to do some preliminary cleaning.
If you have relatively clean water where you live, then flush out the radiator, blocks, tubing and reservoir with tap water. If you don't have access to clean water, then buy a couple extra jugs of distilled water to flush everything.
For the radiator and reservoir, I like to get a good amount of water inside and shake it back and forth to get all the crap out. For the blocks, I like to take each one apart make sure there aren't any metal shavings or chips that might be stuck. Be careful not to stretch or break the rubber seals in the water blocks! If you stretch them, you just threw out $100. I also like to run some water through the tubing to make sure there isn't any leftover coating inside (a funnel is very helpful for this purpose)
The pump is a special case. Some pumps are designed so that water can flow even when it's off, but some aren't. For the DDC style pumps, I simply take them apart (watch the rubber O ring!!) and wash the impeller and top. I would advise strongly against getting water on your pump electronics.
Once you flush everything out, use paper towel or other absorptive material to dry the water blocks and pump components completely. If you are going to leave them overnight, make sure you get every drop off.

Now you're ready for the planning stage. This is a very, very important part of the process and will determine how difficult it's going to be to put your loop together.
This part consists of determining your loop order, where you plan to mount each radiator, reservoir and pump, which way you want to mount fans and determining how long each tubing section needs to be.
Don't actually mount anything just yet. (and as tempting as it is, DO NOT run your new watercooling pump dry)
Get your measurement device out and start figuring. It is VERY helpful to make a picture of how you plan to set up your loop and how each tubing section will fit into the PC.
Measure the approximate distance for each tubing run. Loop order isn't a concern if you're reading this guide. Aim for no crosses and make each tubing run as short as possible. However, make sure you account for bends. Once you have the the length, add 2-3 inches and cut it long. It's much better to have too much tubing than too little. Cut the tubing carefully and as straight as possible with dyes, tubing cutters, a razor blade or sharp scissors. If you have a cut down the length of the tubing, cut that section completely off. Any sort of cut will eventually manifest into a leak.
Because priming your pump is such a PITA, try and keep it as low in the loop as possible to make it easier to get water inside. At the very least, make sure your reservoir is above the pump.
Double check and triple check that you have the optimal layout for your hardware and tastes. It would really suck to cut your tubing and realize that it's not long enough halfway through. Once done, you're ready for the next part.
The next part is - you guessed it! - mounting everything. This part is, of course, going to be different for everyone. Here are some guidelines to help make sure you don't break anything:
Usually a hand tight with a little help from a wrench/pliers is all it takes to get a good seal. The fittings have O-rings that will break with too much pressure. If a length of tubing is too long when you install it, cut it by about half as much as you think you need to. I can't count the number of times when I swore it needed an inch off when it was really half that
The screws can, and will, go right through the fins on the radiator and create a nice leak for you to clean up once you start filling. Not only that, but damage from over tightening is not covered under any warranty for radiators
If your designated fill hole isn't able to be easily reached by a funnel or other filling device, make sure you add a tube that you can remove later and make filling much easier
I've had waterblocks that could be tightened to produce almost 200 lbs of pressure on the CPU because it was designed for multiple heights. This isn't at all necessary and can break components if you aren't careful
Tubing can, and sometimes will, slowly slip off barbs over time. This method minimises the effect
If you're using a silver kill coil, be sure to actually include it in your loop and don't forget about it!
Once you've got everything hooked up, do yourself a favor and double check EVERYTHING. Make absolutely sure that all your connections are solid and ready for water.
Once you're ready, start slowly filling up your loop with water or coolant until you can't fit anymore. A very important part of the process that people often miss is pump priming. Priming a pump simply means to make sure your pump has water in it before it starts pumping water. Failure to do so could cause your pump to run dry (which will ruin it very quickly).
There really isn't an easy way to tell if you have water inside the pump other than by turning it on for a second to see if it starts moving water. If it doesn't sound like water is moving (it should be quite loud and very obvious) the shut off the pump immediately.
Throughout this process, you WILL spill water on something. Once you do, very carefully absorb it with the paper towel and continue filling. If you spring a leak, get a wad of paper towel, absorb the leak and slowly start to drain your loop. If water gets on the computer components, thats fine, just carefully pat it dry and keep going.
Keep filling and running the pump until it gets back around to the fill area and can keep going around with no extra water.
Then run the pump and keep filling as the air bubbles start to get pushed out. Carefully tip your case back, forth, left and right (I've even turned cases upside down, although this might actually give you more bubbles depending on how your loop is set up). As more bubbles come out, your pump should start to quiet itself down.
It is at this point that I like to set my power supply up and let the pump run overnight for some extended leak testing. People like to put paper towel near all of the fittings and potential leak points to identify little drops. If anything feels damp at all, you have a problem. Check fittings first, then look for cuts in tubing, bad seals and other things.
If there were no problems, congratulations, you completed your first custom loop! Hook everything up to you PC power supply and enjoy the temperatures and quiet. For the first few weeks, I would double check the fittings and make sure no sneaky leaks have popped up, but that's about it. Check your water level in the reservoir occasionally. Water does evaporate, but large amounts of missing water are a telltale sign of a leak.
If you did find a sneaky leak, it's time to drain your loop. Carefully disconnect a tube near the bottom of your loop and allow all the water to drain out. Paper towels really come in handy for this part. Once drained, check all the things that could have gone wrong. Chances are, it's a fitting that was over tightened or not tightened enough. Check for good seals in compression fittings and barbs. Finally make sure there isn't a tiny cut in the tubing or other leak point. If you found something obvious, remedy the situation and refill her. If not, keep looking!
Little air bubbles could come loose as the water settles and get into your pump which may make a grinding noise if it makes it that far.
Every 6 months or so, you are going to want to perform some routine maintenance on your loop. This maintenance is pretty straightforward and generally easy to perform:
Water circulating around a cooling system eventually gets pretty dirty, and refilling it with clean water will help keep your blocks clean and your temperatures down
Use the same methods as you did when you first got them
Depending on how stained it's gotten, replacing your tubing may be worthwhile
Once you finish, fill up your system just like you did when you first set it up and check for leaks.
Water cooling systems, while relatively complex, are actually easier to set up than most people think. I wrote this guide in the hopes that it would convince or at least help convince more people with the time and knowledge to go out and setup your own loop.
This is not the best water cooling guide out there, nor the most complete. As always, this will be a work in progress forever.
Weather or not you learned something from this guide, I hope you enjoyed reading it as much as I enjoyed writing it. Once again, thanks for reading and good luck with whatever project you plan to pursue.